Configuring BTRFS on Arch
8 minutes read
This guide is for anyone who’s just installed Arch Linux with GRUB and BTRFS. I’m going to keep things straightforward, using the defaults set up by archinstall. If you’re ready, let’s dive in!
Install Required Packages
First things first, we need some essential tools to manage BTRFS effectively. Open up your terminal and run:
What Are These Packages?
Snapper: This handy tool helps you create and manage BTRFS snapshots. Think of snapshots as save points in a video game—they let you revert your system to a previous state if something goes wrong.
Snap-pac: This adds a hook to
pacman, Arch’s package manager. Basically, it automatically takes a snapshot before or after you install, remove, or upgrade packages. This is super useful because if an update breaks something, you can roll back without a hassle.Grub-btrfs: This package helps integrate BTRFS with your bootloader, GRUB. It makes it easier to manage boot entries and snapshots from the boot menu.
Procedure
Clean Up Existing Snapshots
If this is a fresh install, you likely don’t have any snapshots yet, but just to be sure, let’s remove any existing ones:
Create a New Root Config
Now, let’s create a configuration for the root filesystem. This will set up a place for your snapshots to live:
This command creates a subvolume /.snapshots where all your snapshots will be stored. It’s like giving your snapshots a nice home!
Reinitialize Snapshots
Next, we need to make sure the .snapshots directory is accessible:
This mounts the .snapshots subvolume so Snapper can actually use it.
Fix Some Permissions
Let’s set the right permissions to ensure everything works smoothly:
These commands set the permissions so that only the root and users in the wheel group can access the snapshots, keeping your system secure.
Enable Automatic Snapshotting
To make your life easier, we want to enable automatic snapshotting. This way, you won’t have to remember to take snapshots manually:
This enables two timers: one for creating snapshots automatically at set intervals, and another for cleaning up old snapshots to save space.
Add Snapshots to GRUB
To make sure you can boot into your snapshots, you need to configure GRUB. Open the GRUB configuration file and ensure this line is present:
GRUB_BTRFS_GRUB_DIRNAME="/boot/efi"
This tells grub-btrfs where to find the GRUB directory.
Enable grub-btrfsd
Next, we want to set up grub-btrfsd to automatically generate the grub-btrfs.cfg file whenever you make changes. You can enable it with:
This service will keep your GRUB menu up to date with the latest snapshots, so you can easily boot into a previous state if needed.
Chrooting into a BTRFS System
If you ever need to troubleshoot or repair your system, you might need to chroot into your BTRFS environment. Here’s how:
Boot from an Arch Linux live USB.
Open a terminal.
First, you need to mount your BTRFS subvolumes correctly. Here’s how you can do that with the default setup from
archinstall:Replace
/dev/sdXYand/dev/sdXZwith your actual device identifiers (you can find these usinglsblk).Once everything is mounted, enter the chroot environment:
You’re now inside your system’s environment and can make changes as needed.
System Rollback the Arch Way
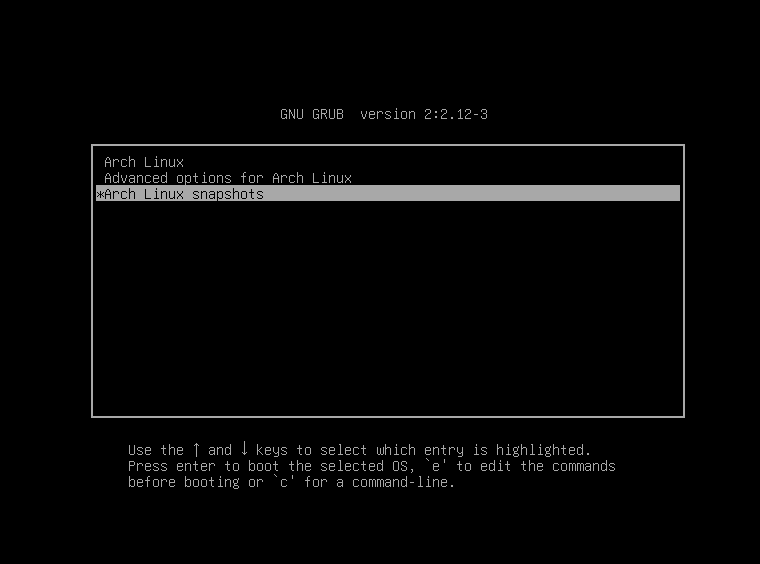
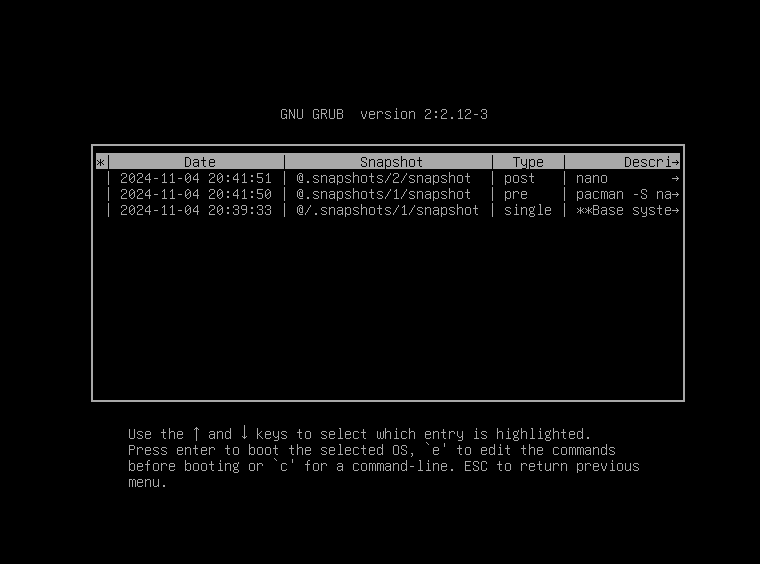
Here’s what the result looks like: 
 One of the coolest features of BTRFS is its snapshot capability, which allows you to roll back your system if something goes wrong. Here’s how to do it, based on points from the Arch Wiki:
List Existing Snapshots: First, check your existing snapshots to see what you have:
This will show you a list of snapshots, along with their IDs.
Roll Back to a Previous Snapshot: If you find a snapshot that you want to revert to, you can use the following command:
Replace
<snapshot_id>with the ID of the snapshot you want to roll back to.Reboot Your System: After rolling back, reboot your system to apply the changes:
When your system starts back up, it will be in the state it was at the time of that snapshot.
Important Note
Rolling back will restore the files in the root subvolume to their state at the time of the snapshot. However, be careful—any changes made after the snapshot will be lost. Always ensure you have backups of important data before rolling back.
Here’s the expanded guide with the requested additions regarding btrfs scrub and working with writable snapshots:
Scrubbing BTRFS for Data Integrity
One important maintenance task for any BTRFS filesystem is to regularly scrub the filesystem. Scrubbing checks the integrity of your data by reading every block and verifying checksums. It can also help detect and fix corrupted data, ensuring that your system remains stable over time.
What is btrfs scrub?
btrfs scrub is a command used to check and repair the BTRFS filesystem. It verifies the checksums of all blocks in the filesystem and attempts to fix any errors it encounters by using redundancy data (if you have RAID or other redundancy options enabled). This is a good preventive measure to keep your filesystem healthy, especially in case of hardware failures or minor corruption.
How to Use btrfs scrub
To start a scrub on a BTRFS filesystem, you can use the following command:
Where /mnt is the mount point of your BTRFS filesystem (replace it with the actual mount point). The -B flag runs the scrub operation in the background, which means it won’t block your terminal.
To check the status of the scrub, use:
If you ever need to stop a scrub operation (though it’s generally better to let it finish), you can do so with:
Scheduling Regular Scrubs
To keep your system’s integrity in check, you can set up a cron job or systemd timer to run scrubs periodically. Here’s an example of a systemd timer:
Create a systemd timer file
/etc/systemd/system/btrfs-scrub.timer:[Unit] BTRFS Scrub Timer [Timer] 15min 1w btrfs-scrub.service [Install] timers.targetThen, create the corresponding service file
/etc/systemd/system/btrfs-scrub.service:[Unit] BTRFS Scrub [Service] oneshot /usr/bin/btrfs scrub start -B /mntEnable and start the timer:
This will automatically scrub your BTRFS filesystem once a week, and 15 minutes after each boot.
Booting into and Working with Writable Snapshots
Sometimes, you might need to boot into a previous snapshot and even make changes to it, especially if you’re troubleshooting or testing a new setup. BTRFS allows you to create “writable snapshots,” which are snapshots that you can modify.
Here’s how to boot into a writable snapshot and make it the default boot target:
Step 1: Create a Writable Snapshot
First, you’ll want to create a snapshot that you can boot into and work with. You can create a snapshot using Snapper - we’ve already done this, so you can skip this step:
This creates a snapshot of the current root subvolume.
Step 2: Make the Snapshot Writable
To make a snapshot writable, you need to clone it. Cloning a snapshot essentially creates a new subvolume that can be modified. To clone the snapshot you just created, run:
This command creates a writable version of the snapshot by cloning it into a new subvolume. Replace <snapshot_id> with the actual ID of the snapshot you want to clone.
Step 3: Set the Writable Snapshot as the Default
Now that you have a writable snapshot, you need to set it as the default subvolume for booting. You can do this by modifying the grub-btrfs configuration.
Edit your
/etc/default/grubfile and add or modify theGRUB_BTRFS_SUBVOLUMEline to point to your new writable snapshot:GRUB_BTRFS_SUBVOLUME="/.snapshots/<snapshot_id>-writable"Rebuild the GRUB configuration:
Step 4: Boot into the Writable Snapshot
Now, when you reboot, the system will boot from the writable snapshot. You can make changes to this snapshot without affecting your main system.
Step 5: Optionally Prune Snapshots After Boot
If you want to remove older snapshots (pruning them), you can use the following command to clean up:
Or, if you want to prune multiple snapshots based on age or other criteria, Snapper has some handy cleanup features:
This command will remove snapshots that are older than 30 days. You can adjust the -d flag to prune snapshots based on different age or other parameters.
Conclusion
And there you have it! You’ve successfully configured BTRFS on your Arch Linux installation, set up automatic snapshots, and learned how to roll back your system when needed. This setup not only enhances your system’s stability but also gives you peace of mind, knowing you can revert to a previous state if something breaks.
With these additions, you now have a full toolkit to manage your BTRFS filesystem with Arch Linux. You’ve learned how to scrub your filesystem for data integrity, and how to work with writable snapshots, including how to make them the default boot option and clean up old snapshots after use.
This will make your Arch Linux system much more flexible and stable, providing the ability to revert to working states with snapshots and to test changes safely using writable snapshots.
Feel free to play around with the snapshots and see how they work—it’s a powerful feature that can save you a lot of headaches in the long run. Happy tinkering!
Happy Arch’ing!